A virtual convention booth that keeps working after the show.
Comic conventions are where readers discover publishers, but a booth costs thousands and lasts a weekend. A ForeverComicCon booth is a permanent space on a 3D convention floor that sends people to your site every day, and shows you exactly who stopped by. This page walks through claiming one and setting it up, screen by screen.
Step-by-step guide with pictures ↓ · 16 steps · Ten minutes to claim. Half an hour to dress the booth fully.
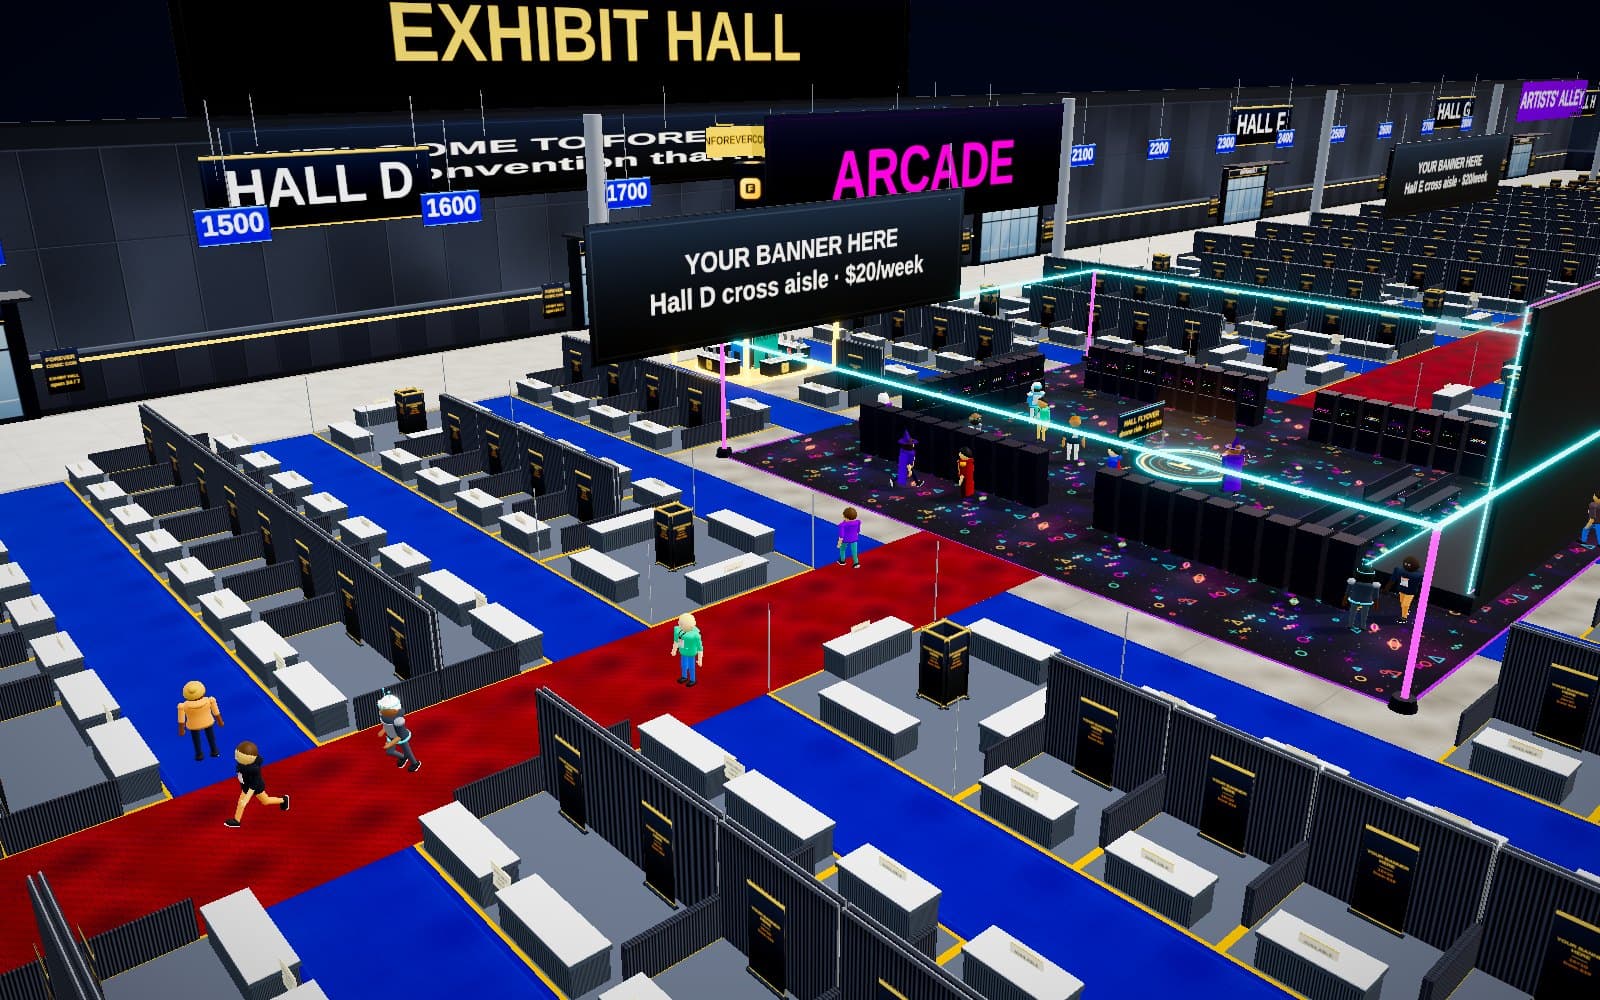
How to do it, screen by screen.
Written for someone who has never used the site. Every step says exactly what to press and shows what you will see. Ten minutes to claim. Half an hour to dress the booth fully.
Have ready before you start
- An email address and a card. A 10×10 booth is from $10, a corner from $20, an island from $50. (Or a booth code.)
- The link your banner should open: your store, site, Kickstarter or newsletter.
- A square logo, a tall banner (1200 × 2400 px) and a wide one (2000 × 500 px). All can be added later.
- Front covers of the comics you want on the table (600 × 900 px each) and where each one is sold.
Step 1: Open the site and press the yellow button
Go to forevercomiccon.com. The big yellow button under the headline says Get a booth from $5. Press it.
The 3D hall opens in the same tab. The first time it loads you will see "Opening the hall" for a few seconds while the floor and the models download. Nothing to install.
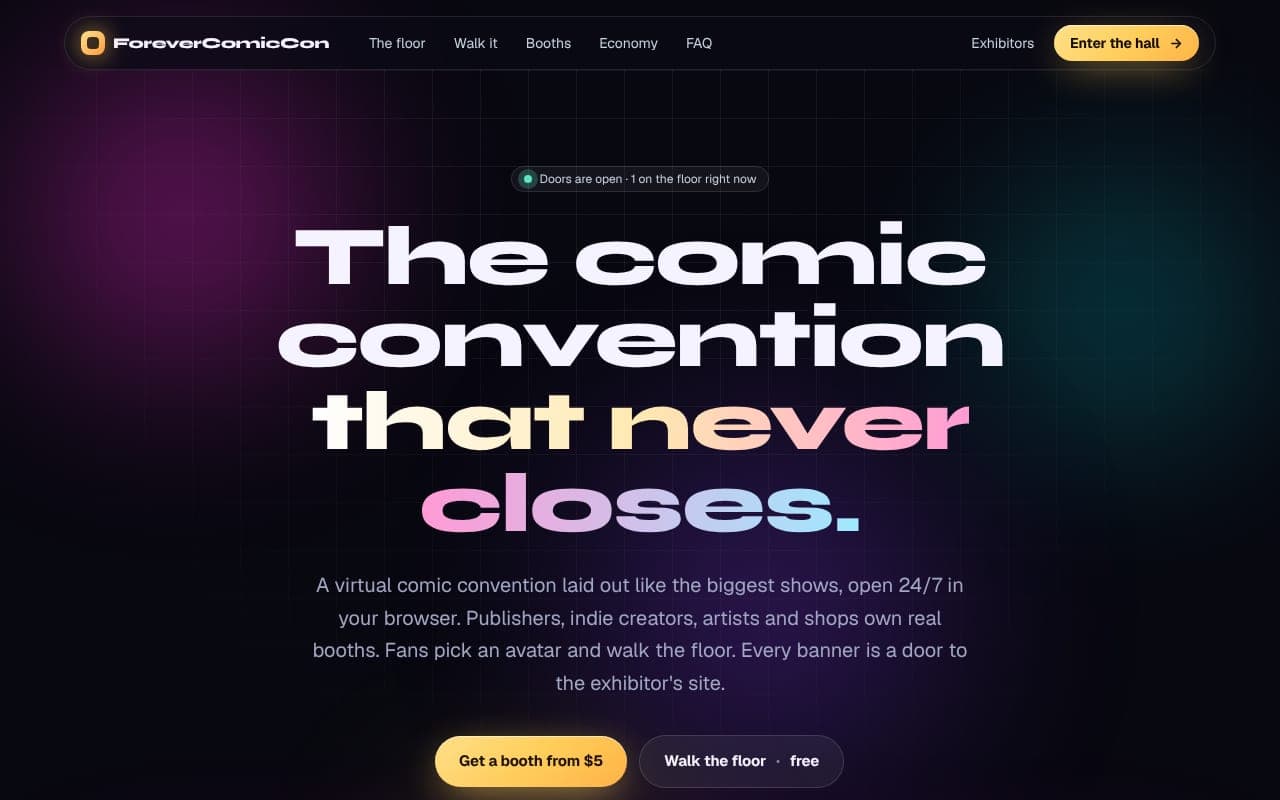
The home page. The yellow button starts the claim. 💡 You do not need an account to look around or to set up your booth. You are asked to sign in only at the very end, when it is time to pay.
Step 2: Pick a space
A panel called Get a booth opens on the left of the hall. At the top are four size buttons with prices. Press the size you want.
Below the buttons is the floor plan: grey squares are open, coloured ones are taken, and the arcade is the pink block in the middle. Under the map is a list of open spaces with their booth number, size, zone and price.
Booth numbers tell you the hall and aisle: booth 1725 is in Hall D on aisle 1700. Click the space you want.
- AA table · from $5: a 6-foot Artists' Alley table at the east end. A gridwall of prints with your name across the top, a chair, and your portfolio on the wall and in a book on the table.
- 10×10 · from $10: an inline booth with a back wall, side drapes, a table, four comic stands and a roll-up banner.
- 20×10 · from $20: a corner booth, double wide with two tables and two open sides.
- 20×20 · from $50: an island, open on all four sides, with a tower sign and up to four tables.
- Spaces in Front of house cost 1.5× and in Headliner Row (around the arcade) 2×. More people walk past them.
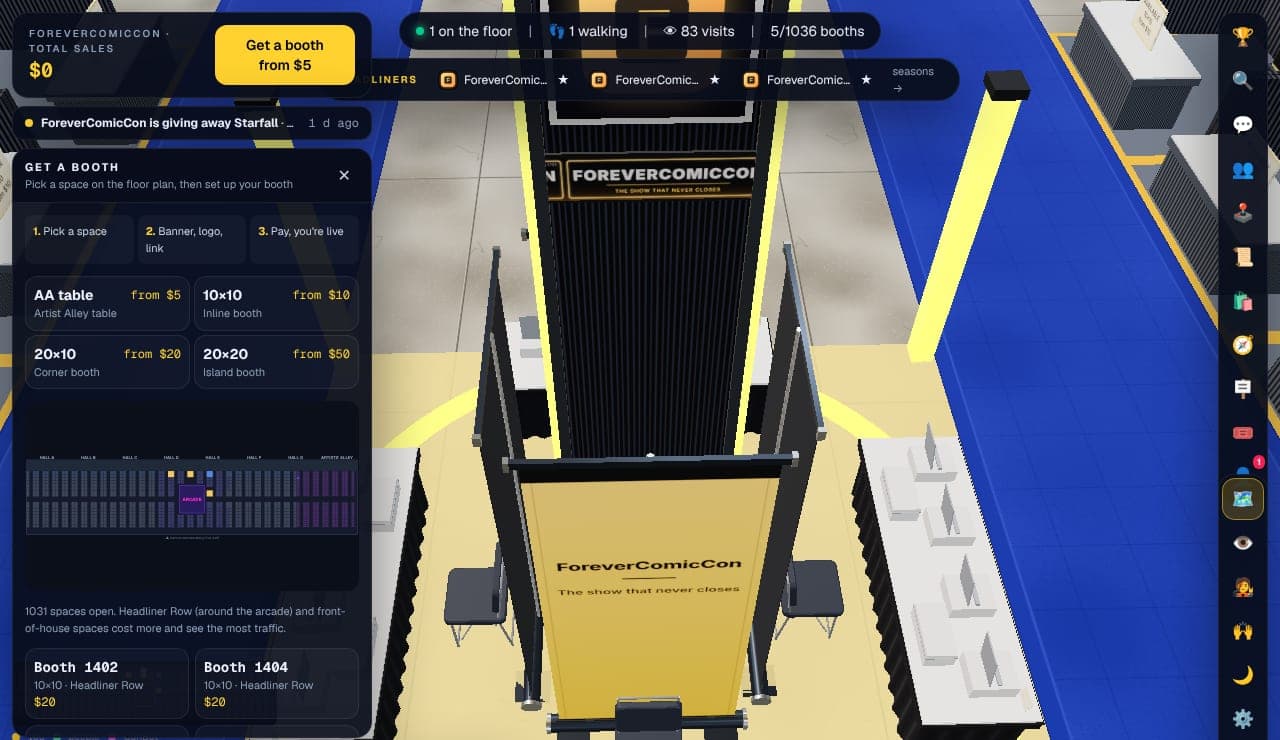
The Get a booth panel. Press a size, then click a space in the list or on the map. 💡 You can also walk the floor and click any booth with an AVAILABLE sign on its table. Its card opens with the same Set up & claim button.
Step 3: Check the space, then press Set up & claim
The card for that space shows its price, what kind of booth it is and what comes with it: a permanent booth number, a banner with your logo, tagline and link, tracked visits and clicks, and a shareable card.
Press the yellow Set up & claim this space → button.
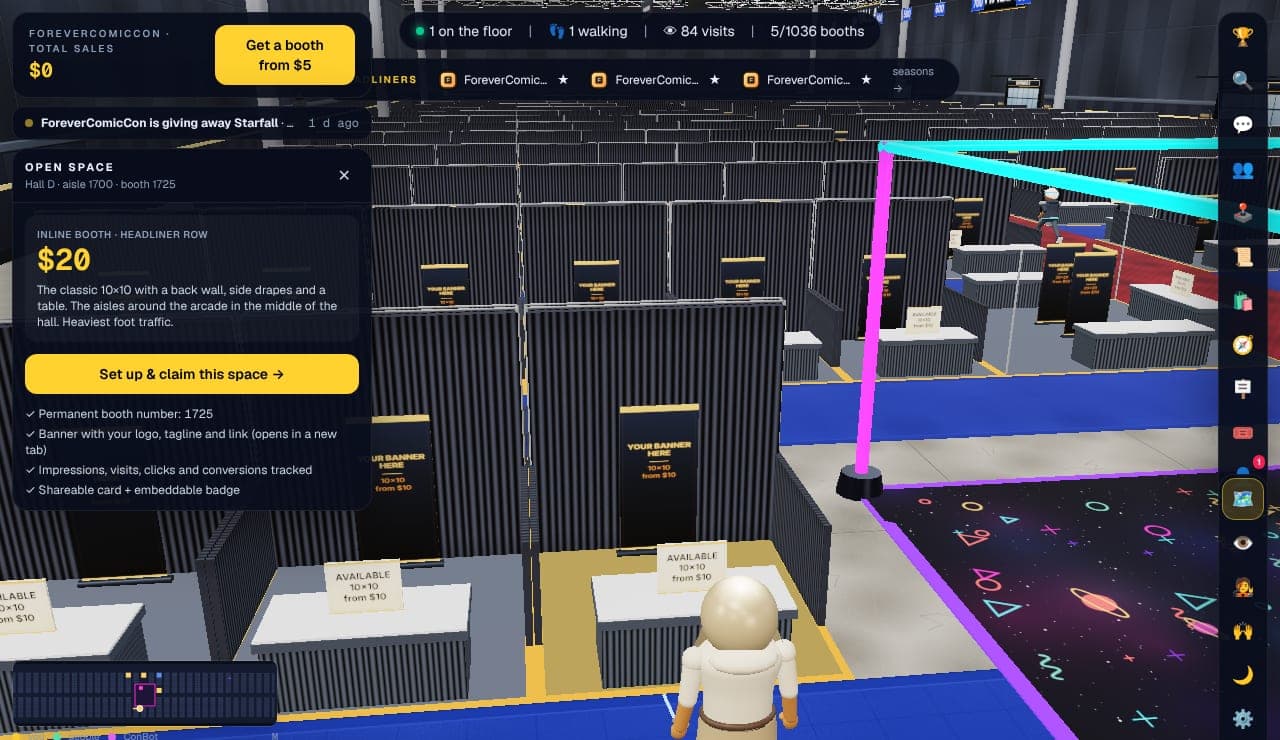
An open 10×10 in Headliner Row. The yellow button starts the setup. Step 4: Fill in your name, link and look
The setup form opens where the card was. Everything you type shows up on the booth behind it straight away, so you can see what visitors will see.
Fill in the boxes from the top down:
- Exhibitor name: your studio, shop or publisher name. This goes on your banner and in the directory.
- Tagline: one line that goes on the banner under the name, such as "Horror comics from Ohio".
- Website: where people go when they click your banner. Your shop, Kickstarter, Patreon, Linktree or webcomic. Must start with https://.
- Logo: press Upload and pick a square PNG or JPG, or paste an image link. Until you do, your initials are used.
- Banner colour and Accent: tap a swatch. The banner, drapes and table cloth recolour as you tap.
- Further down: your social handles (Instagram, X, Facebook, ArtStation, DeviantArt, GlobalComix) and an About paragraph. All optional.
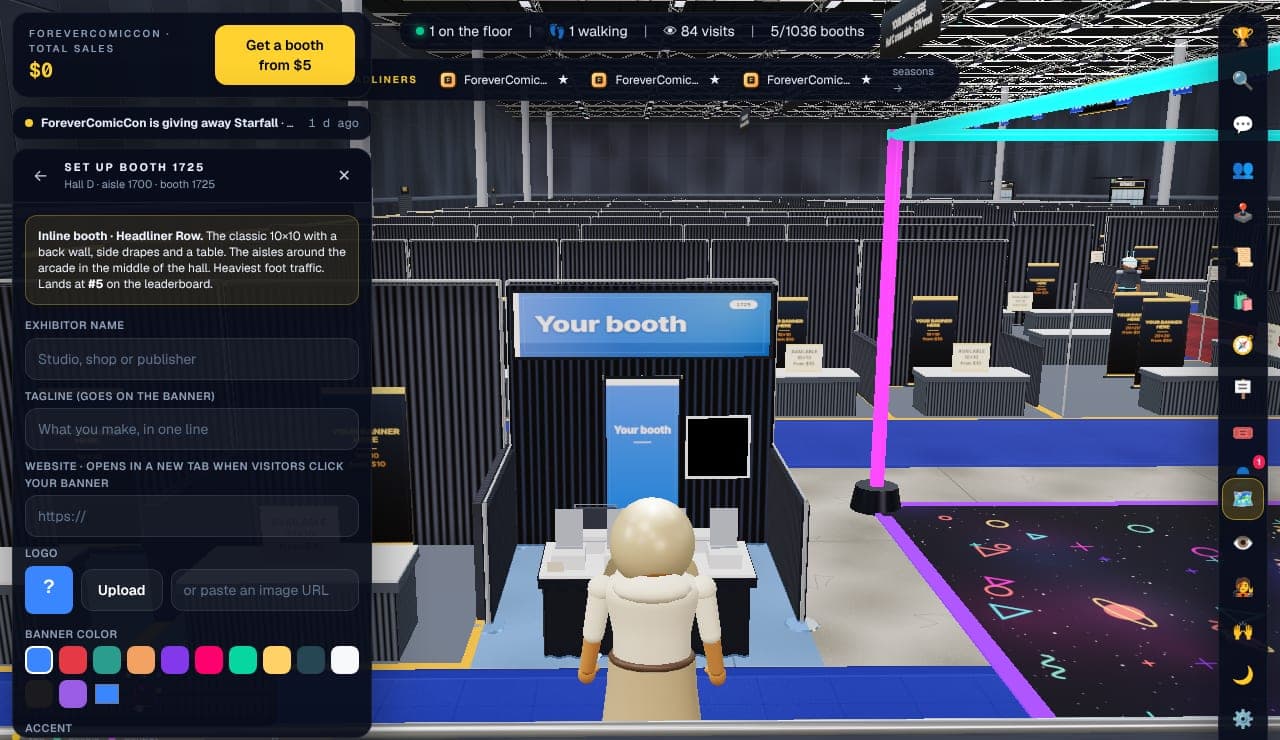
Type a name and the banner behind the form changes as you type. 💡 Every one of these can be changed later from your dashboard, for free, as often as you like. Do not agonise over it now.
Step 5: Pay and go live
Scroll the form to the bottom. The price of the space and the total are shown. If someone gave you a booth code, press Have a booth code? and type it; the total drops to $0.
Press Continue to payment →. If you are not signed in yet you are asked for an email and password first (your setup is kept). Then you are sent to the card checkout, which is run by DivinityCoin; we never see your card.
When the payment lands you come back to the hall and your booth is on the floor with your name on it. You also get an email with a link to your dashboard.
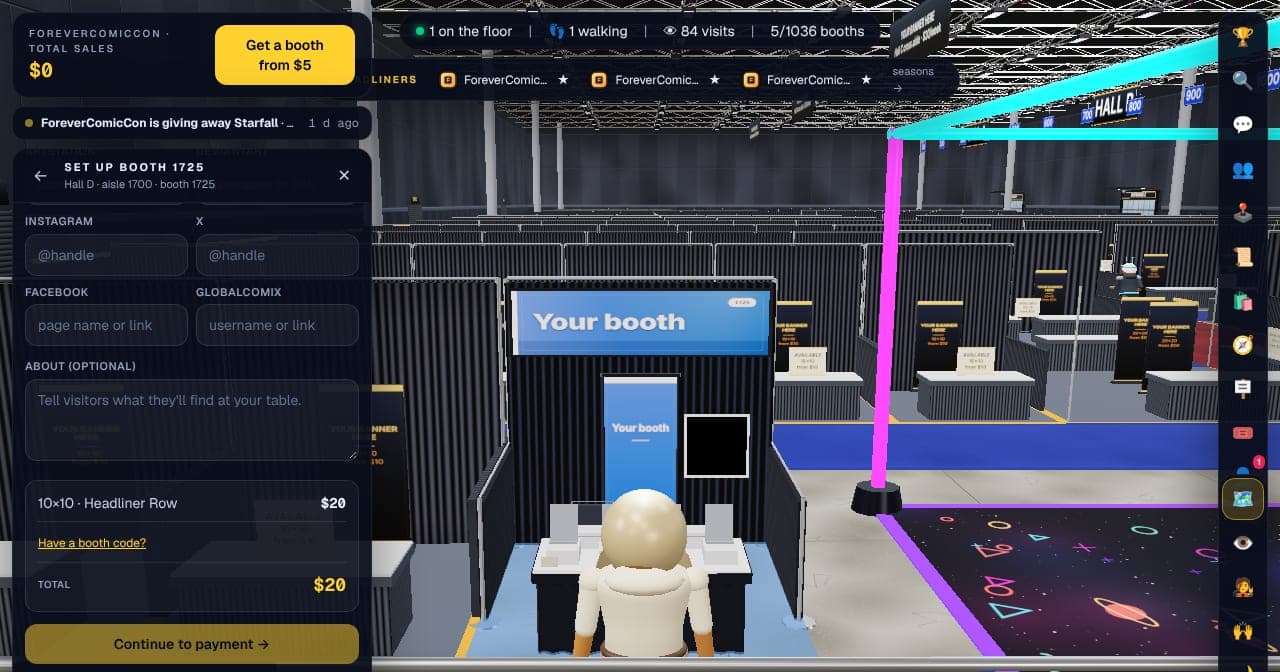
The bottom of the form: the total and the Continue to payment button. 💡 Changed your mind? A claim is refunded in full within 24 hours as long as nobody has clicked or taken over the booth yet. Rules & refunds in the footer has the details.
Step 6: Open your dashboard
Press Dashboard in the bar at the bottom of the hall, or go to forevercomiccon.com/app/dashboard. Your booths are listed on the left; click one to work on it.
The top of the page is your numbers: Impressions (people who walked past), Unique visitors, Booth visits (walked up or opened it), Website clicks, click-through rate and where the clicks came from. Switch between 7, 30 and 90 days with the buttons at the top right.
Below the numbers are the cards that change your booth. Each one is described in the next steps.
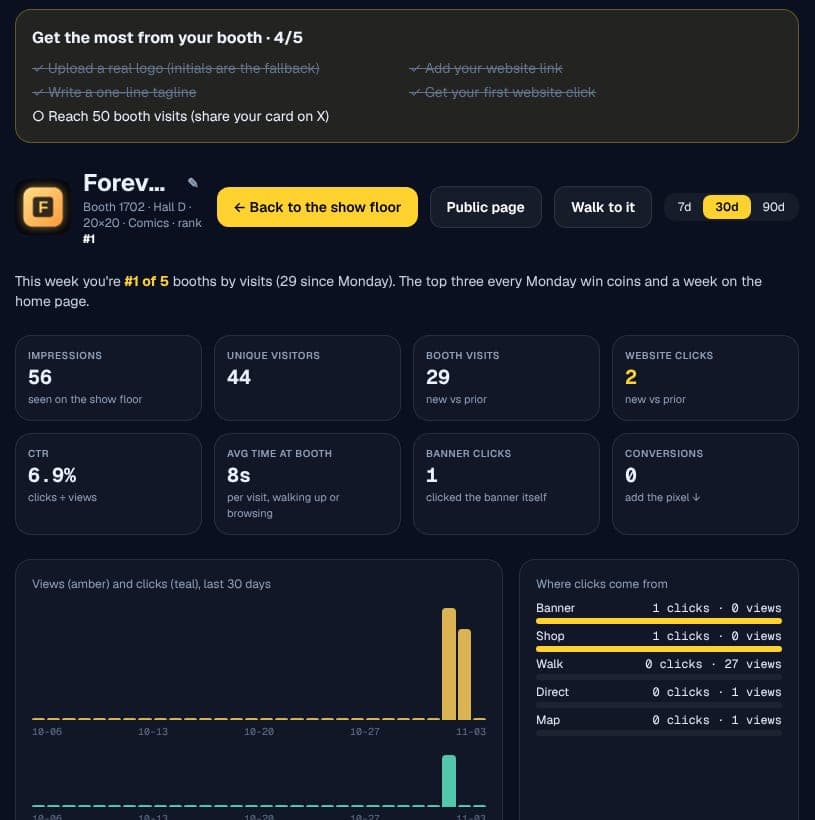
The top of a booth's dashboard. The checklist at the top walks you through the first things to do. Step 7: Edit booth: name, links and colours
The Edit booth card holds what you typed at setup plus more: the website, six social links, tagline, description, logo, colours, banner style, table cloth colour and category.
Change anything and press Save. The floor updates the moment you do, with no reload, for everyone in the hall.
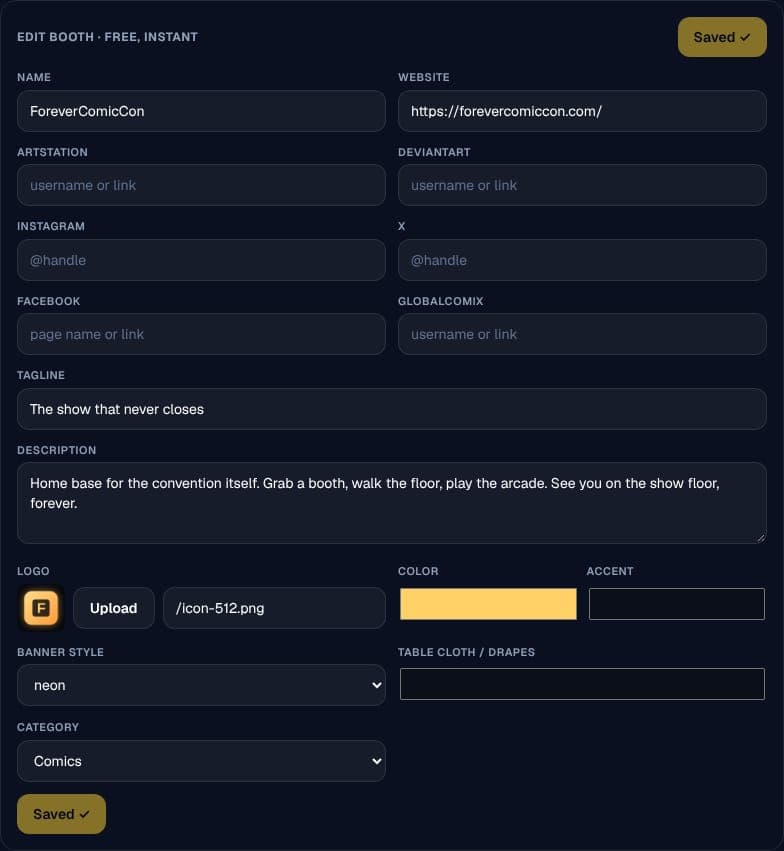
Edit booth. Free, instant, as often as you like. Step 8: Upload your banner art
The Banner artwork card has one box per place art can go on your booth. Each box says the size to upload, how big it is on the floor and what reads well from the aisle. Press Upload in a box, pick the file, and it is cropped to fit.
Uploads take PNG, JPG, WebP or a PDF (first page), up to 12 MB.
- Roll-up banner (1:2, 1200 × 2400 px): the tall retractable banner behind your table. The one everyone sees first.
- Wide banner (4:1, 2000 × 500 px): across your back wall, and on the header and hanging sign when you have them.
- Table drape (3:1, 1800 × 600 px): printed on the front of your table skirt.
- Islands also get a tower wrap, a floor graphic and one roll-up per side.
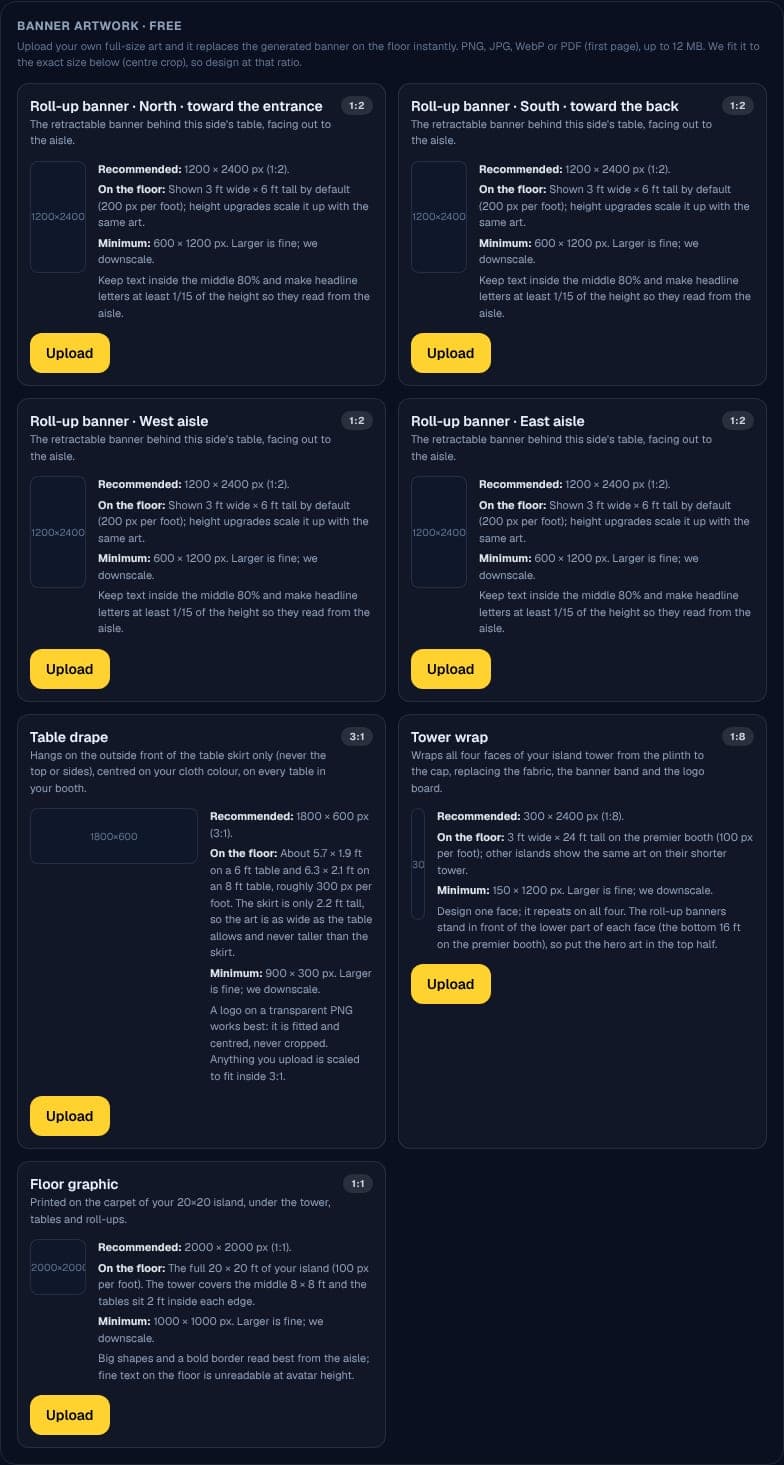
Banner artwork. Each box tells you the exact size to make. 💡 No art yet? The booth draws a banner from your name, tagline, logo and colours, so it never looks empty. Replace it when you have something.
Step 9: Stand your comics on the table
The Books on display card is your table's comic stands. Each stand costs $5 once. Press Display a book (pick how many stands you want), pay, then press Upload cover on a stand and pick the front cover (2:3, 600 × 900 px). Type where to buy it in the Buy link box under the cover and press Save link.
On the floor the cover stands on your table. Visitors tap it in your booth panel to see it full size, and the Buy button opens your link.
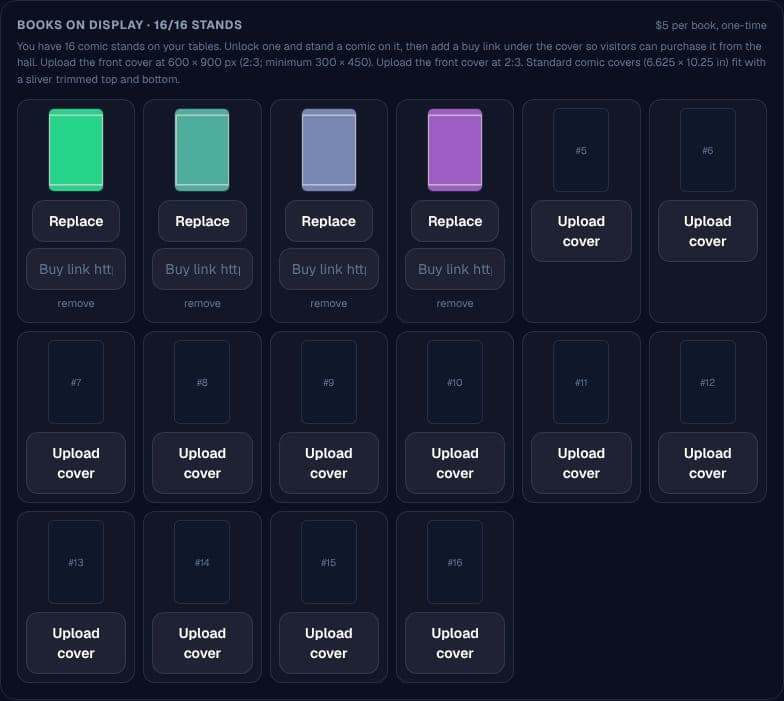
Books on display. Four covers up, twelve stands waiting. 💡 No comics to show? The On the table card just above lets you hang your portfolio on a print wall behind the table, put framed prints on the stands instead, or leave the table bare.
Step 10: Choose what the table shows
The On the table card has four choices. Comic covers is the default: the books you unlocked, one per stand. Print wall hangs your portfolio as 11 × 17 prints on a wall behind the table, from table height up to about 14 ft, and lays an open portfolio book on the table that visitors click to flip through (island booths have no back wall, so they skip this one). Art prints on the stands puts framed pieces from your portfolio on the stands instead and flips through them while someone is at the booth. Off leaves the table bare. All four are free.
Pick one and it saves on its own. Nothing is deleted when you switch; your covers and pieces are kept.
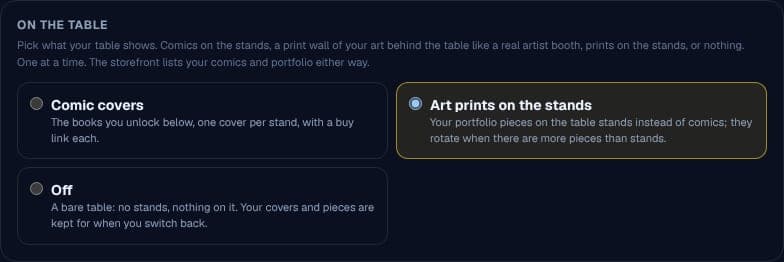
On the table: covers, a print wall, prints on the stands, or nothing. Step 11: Add a shop
The Shop card lists up to 8 items: a name, a price, one line about it, a square photo (800 × 800 px) and the link to buy it on your own store (Shopify, Gumroad, Etsy, your site).
Visitors open the item inside the hall and press Buy, which opens your page. You keep every sale; there is no commission. The dashboard counts Buy presses per item.
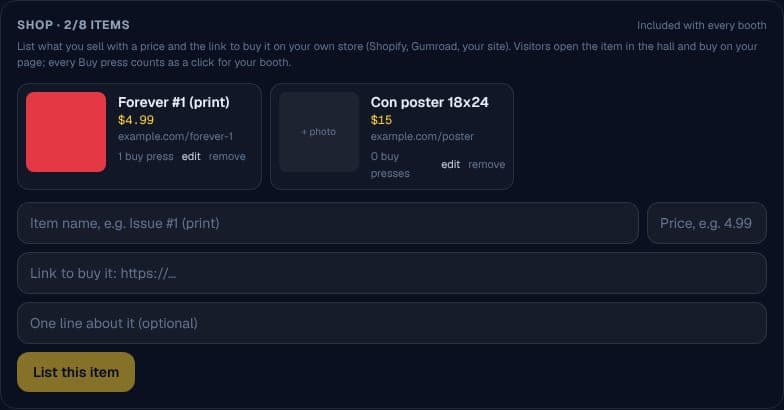
The Shop card. Items are bought on your own store. Step 12: This is what visitors see
On the floor your booth has your banner on the back wall, the roll-up behind the table, your logo on the board and your comics standing on the table. Walking up and pressing E opens your panel: logo, name, tagline, a yellow Website button, the comics under On the table (tap one to see it big, Buy opens your link) and your Shop.
Clicking your banner on the floor opens your website in a new tab.
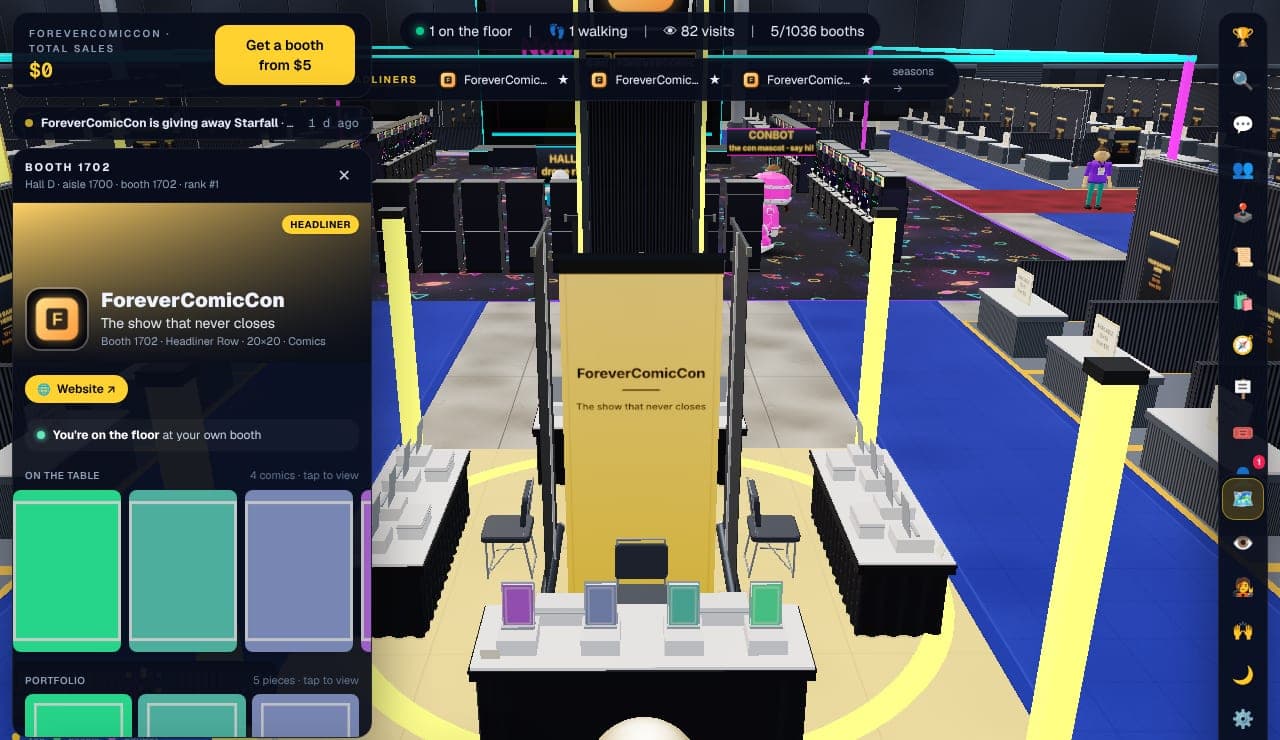
Your booth as a visitor sees it. Step 13: Let your team help
The Teams card lets you make a team and add people, by name if they are already your friend in the hall or by email if not. Team members can sit at your booth's chairs and show up as your crew.
Tick manager next to a person and they can run the booth with you: edit the listing, upload art, stand comics, manage the shop, read the numbers. Money, plans and releasing the booth stay with you. Untick it to take it back.
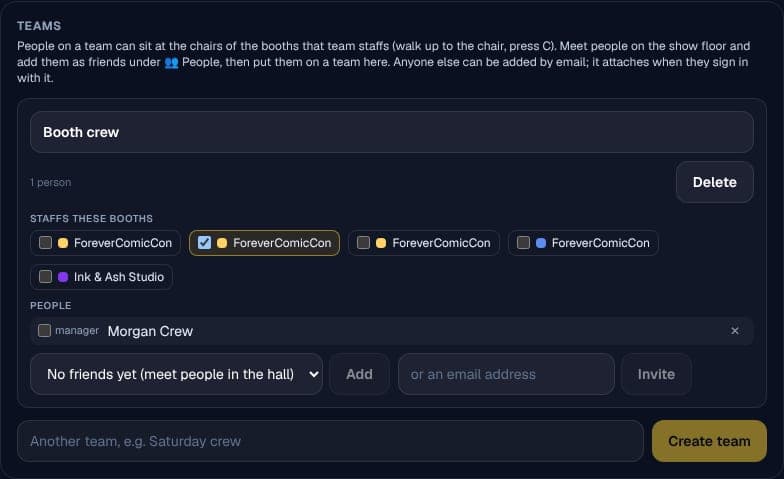
Teams. Tick manager and that person can run the booth. Step 14: Share your booth
The Share your booth card draws a card from your banner art and logo with your booth number on it. Press a button to post it to X, Bluesky, Facebook or Reddit, copy the link for Discord, or download the picture. A caption is written for you.
Each link is tagged, so the Where clicks come from table on your dashboard shows what each post brought in.
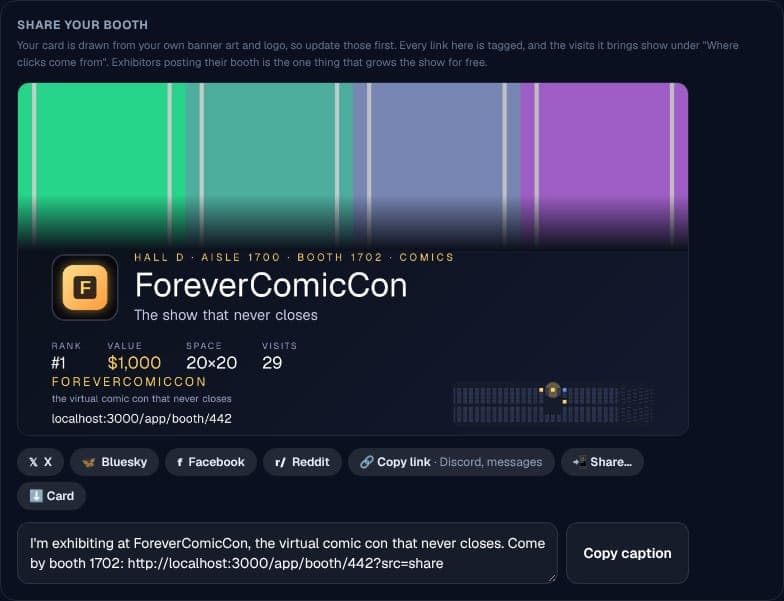
Share your booth. One press per network. Step 15: Grow it, or let it grow
Grow boosts your booth's value, which moves it up the rankings and the directory. Your booth can also be taken over by someone paying 1.25× its value. If that happens you get your full value back plus 60% of the premium as credit, instantly, to spend on another space.
Plan: the optional Pro plan ($9 a month) adds a hanging aisle sign, premium banner styles, 90 days of numbers, a guestbook and a weekly email report. Cancel any time.
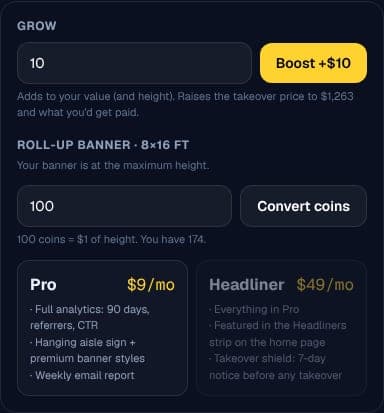
Grow: boost the booth's value. Step 16: Watch what happens
Come back to the dashboard whenever you like. The number tiles and the two charts show, day by day, how many people walked past, how many stopped, how many clicked through, and which of your posts sent them.
Change one thing at a time (a new banner, a new tagline, a different link) and watch the clicks the next week. That is something you can never measure at a real con table.
The same dashboard a week later: the chart fills in day by day. 💡 Stuck at any point? Press the ❓ button at the bottom of the bar on the right of the hall. It opens the Help panel, which has every control and every feature. The same pages are at forevercomiccon.com/help.
Every control, key, panel, price and limit is written up in the help pages, and the same pages open inside the hall from the ❓ button.
Booth sizes and prices
Every space is a numbered spot on the floor plan. Spaces near the entrance and around the arcade cost more because they get more foot traffic.
- Artist Alley table: $5. A 6-foot table for an individual creator.
- 10×10 inline booth: from $10. The classic: back wall, side drapes, a table and a roll-up banner.
- 20×10 corner booth: from $20. Double-wide with two open sides.
- 20×20 island: from $50. Open on all four sides with a tower sign. The big-publisher spot.
- Front of house spaces cost 1.5× and Headliner Row 2×, for the busiest aisles.
Analytics you'd never get from a real booth
At a physical con you guess how many people stopped. Here you know. Every booth gets impressions (people who walked past), unique visitors, clicks to your site, click-through rate and referrers, by day.
Everything links back to you
Your banner, logo and booth page all point at your site, store, Kickstarter or newsletter. You also get a share card for social posts, an embed badge, and a spot in the exhibitor directory and rankings.
- Hanging aisle banners and taller signage for more visibility (Pro).
- Comic covers displayed on your table, linking to where readers can buy them ($5 a stand).
- A shop of up to 8 items, bought on your own store with no commission.
- Team seats so your staff can sit at your booth and talk to visitors, and managers who can run it with you.
- A guestbook and weekly email report (Pro).
Takeovers nobody loses on
Any booth can be taken over for 1.25× its value. If that happens you're refunded your full value plus 60% of the premium as credit, instantly. Your booth's value only goes up.
Questions
How much does a virtual convention booth cost?
From $5 for an Artist Alley table and $10 for a 10×10 booth, up to $50 for a 20×20 island. Busier zones cost more. The optional Pro plan is $9/month.
How long does my booth last?
It's permanent. Your booth stays on the floor plan until someone takes it over, and then you're paid back more than you put in.
What do visitors see?
Your booth in 3D on the show floor (banner, logo, colors, covers on your table) plus a public booth page. Clicking your banner opens your website.
What size should my pictures be?
Roll-up banner 1200 × 2400 px, wide banner 2000 × 500 px, table drape 1800 × 600 px, comic covers 600 × 900 px, product photos 800 × 800 px, logo square. PNG, JPG, WebP or PDF, up to 12 MB. Each box in the dashboard repeats its size.
What analytics do I get?
Impressions, unique visitors, clicks, click-through rate and referrers, by day. The free tier shows 30 days and Pro shows 90.
Can my team staff the booth?
Yes. Add teammates by email or from your friends and they can sit at your booth's chairs and chat with visitors. Tick manager and they can edit the booth too.
The doors are open.
Walking the floor is free. Booths start at five dollars.